Living Beauty Full in the Burbs
Living Beauty Full in the Burbs


Nurturing nature
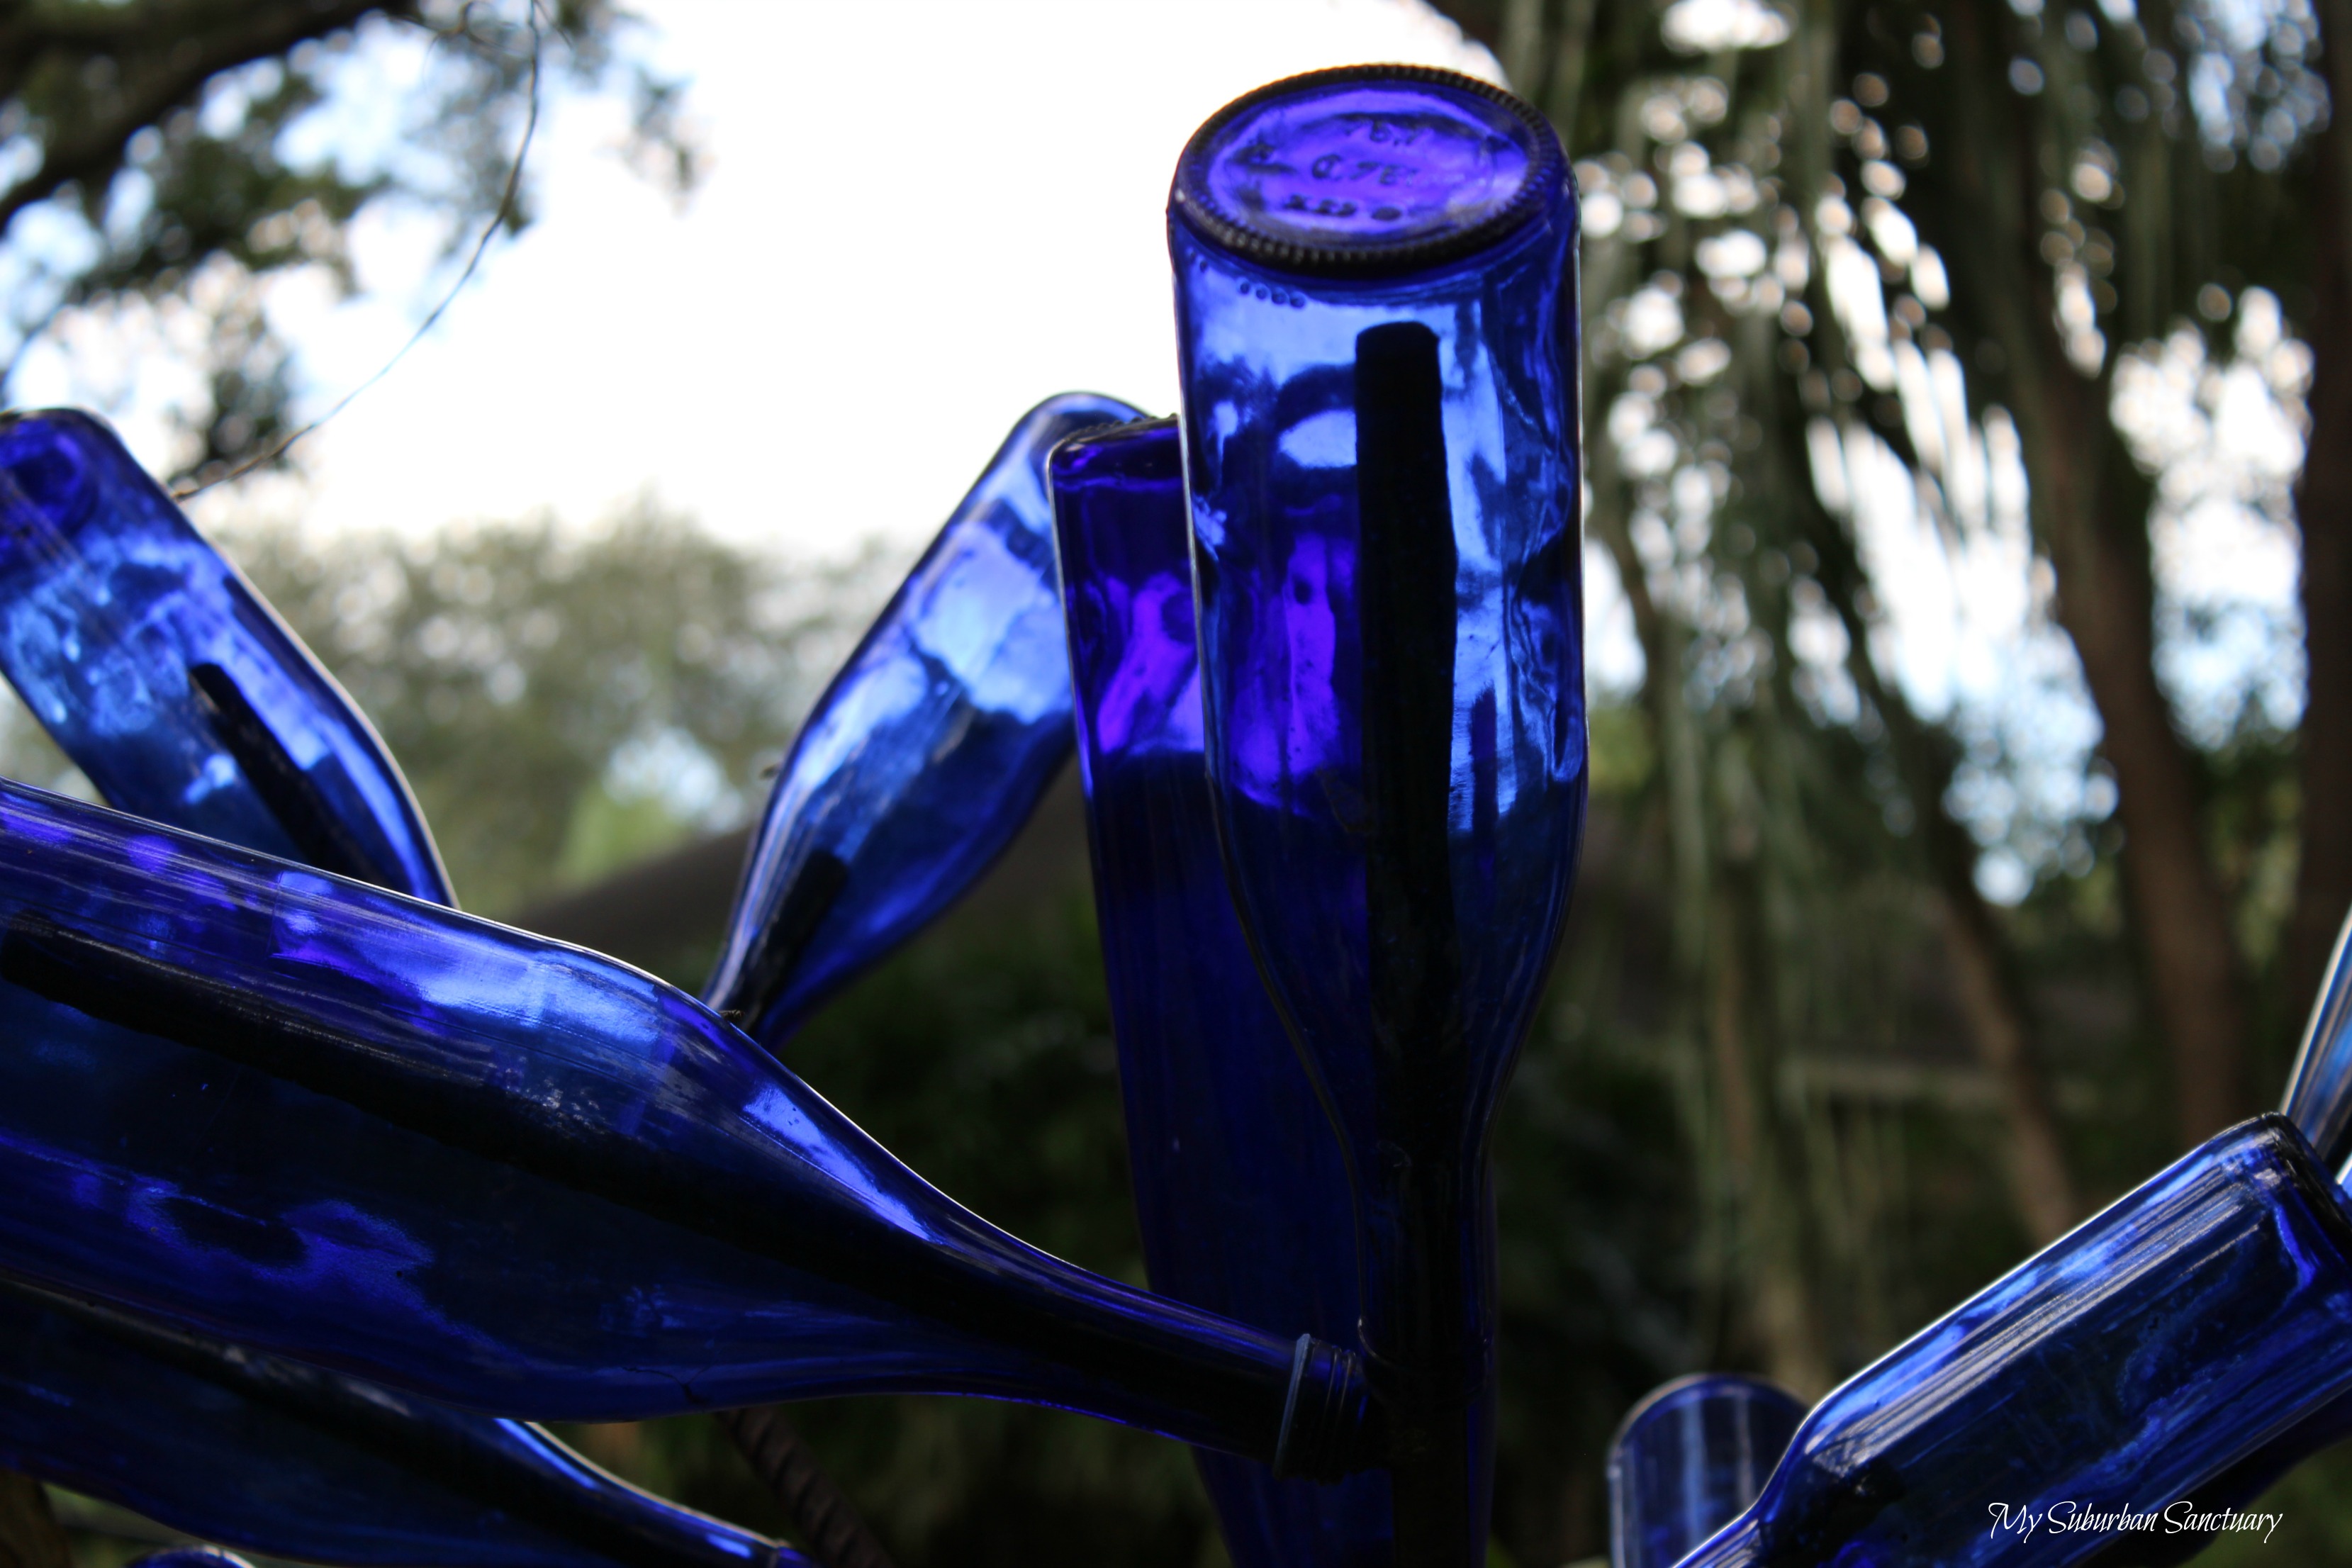
We Southerners take our traditions seriously. And even though I am a yankee transplant I adopted a couple of those traditions as my own. If you drive far enough into the south you are likely to see one, or more bottle trees. Bottle trees are one of those things that northerners don’t “get.” Oh, they like them, they may even attempt one in their own gardens, but in the south a bottle tree is a necessity. Because. They capture bad spirits. Genies, and imps who want to cause problems. It’s true! I have a bottle tree in my back yard and I have yet to see a bad spirit, genie or imp in my home. So there. Proof positive these trees work!

The practice began in the ninth century in the Congo according to historians, and since I don’t know anyone from the ninth century to ask….well, I have to believe the historians know what they are talking about. Or maybe they have a direct line to the ninth century. Anyway….. Central African people believed that they could capture imps and bad spirits in glass bottles and began hanging bottles in trees to attract the spirits and trap them before they could enter their homes. The practice was taken to Europe and North America and the Caribbean islands by slaves and over the years became embedded in the south.
The Smithsonian says, “Bottle Trees have a long history as an element of spiritual, cultural and aesthetic significance in American History and garden design.” WOW! Who knew? Mr B says it’s just another way for me to add junk to the yard and advertise to the neighbors that we may have a drinking problem. Let me just say up front that I have no problem, zero…. with drinking and some of the nastiest tasting wines come out of the prettiest bottles. Make of that what you will.

Legend says that the bright colors attract the spirits and when they enter the bottle they can’t get out. Makes perfect sense…..I can’t get IN a bottle, much less get out of one. I have enough trouble getting in and out of my jeans. HOWEVER…… once trapped inside the bottle sunlight fries the little pranksters before they can do harm. Good thing, I’m not sure I’d want any mess making imps in my home….I still remember the Grands when they were toddlers….. I never thought about trapping them in bottles…………I did, however threaten to send them to “Hell Western Crooked,” a place my Grams always threatened to send me. It sounded like a very bad place and I never, ever wanted to go there. Glad she didn’t have a bottle tree….. Just sayin.
You can purchase pre-made bottle trees from on-line sites or through many local garden centers (if you live in the south). You can also add individual bottles to your garden just by sinking a length of rebar in the ground. You can find rebar in the building section of Home Depot or Lowes. If you don’t know what rebar is, just ask one of the friendly associates. Or use any sturdy metal rod, copper works well and has the added bonus of developing patina with time. (Make sure your metal rods are a smaller diameter than your bottle opening.) You can suspend the bottles from your tree branches by tying them with sturdy twine around the neck of the bottles. A glob of glue for outdoor projects will hold the twine around the neck of the bottle. For the record, I do not recommend pruning tree limbs and placing the bottles on the end of the branches. It causes unnecessary trauma to the tree and improper pruning may actually kill your tree. Just stick with a pre-made one. Unless you have a sturdy dead tree (Is that an oxymoron?) Then prune away and add bottles to your heart’s content.

Author Eudora Welty (1909-2001) made the southern bottle tree famous in her short story, “Livvie.”
“Coming around up the path from the deep cut of the Natchez Trace below was a line of bare Crape Myrtle trees with every branch ending in a colored bottle, green or blue. There was no word that fell from Solomon’s lips to say what they were there for, but Livvie knew there could be a spell put on trees and she was familiar from the time she was born with the way bottle trees kept evil form coming into the house… Solomon had made the bottle trees with his own hands over the nine years, in labor amounting to about a tree a year, and without a sign that he had any uneasiness in his heart, for he took as much pride in his precautions against spirits entering the house as he took in the house….”
Special note: Clean your bottles before using them in the garden. You don’t need drunken bees hurtling around. They like wine. You won’t like tipsy bees.
If you want to protect your home and take the necessary precautions to catch evil spirits, make a bottle tree. You don’t have to become a wine-o. Just do what I did, ask your neighbors to drink the wine and save the bottles for you. They’ll be happy to help. Trust me.
Create the home you see in your heart. You deserve a sanctuary, no matter where you live.
There are a few must haves in any house I’ve lived in. These are what make an ordinary house my home. Without them I feel unsettled. For me, a house without pets, books, photos, or plants is cold and sterile and far from feeling like a sanctuary. This post is about adding another easy care, almost goof proof plant to your home. Plants bring life, color and texture. A large plant can fill a corner of an almost empty room, providing a focal point as you wait to discover just the right piece of furniture. Or bring attention to a treasured piece of furniture. A plant can add softness to a vignette of objects with hard edges. Or bring curves to a room filled with square and rectangular lines of furniture. Plants help clean the air in our modern homes. And let’s face it, plants are beautiful.

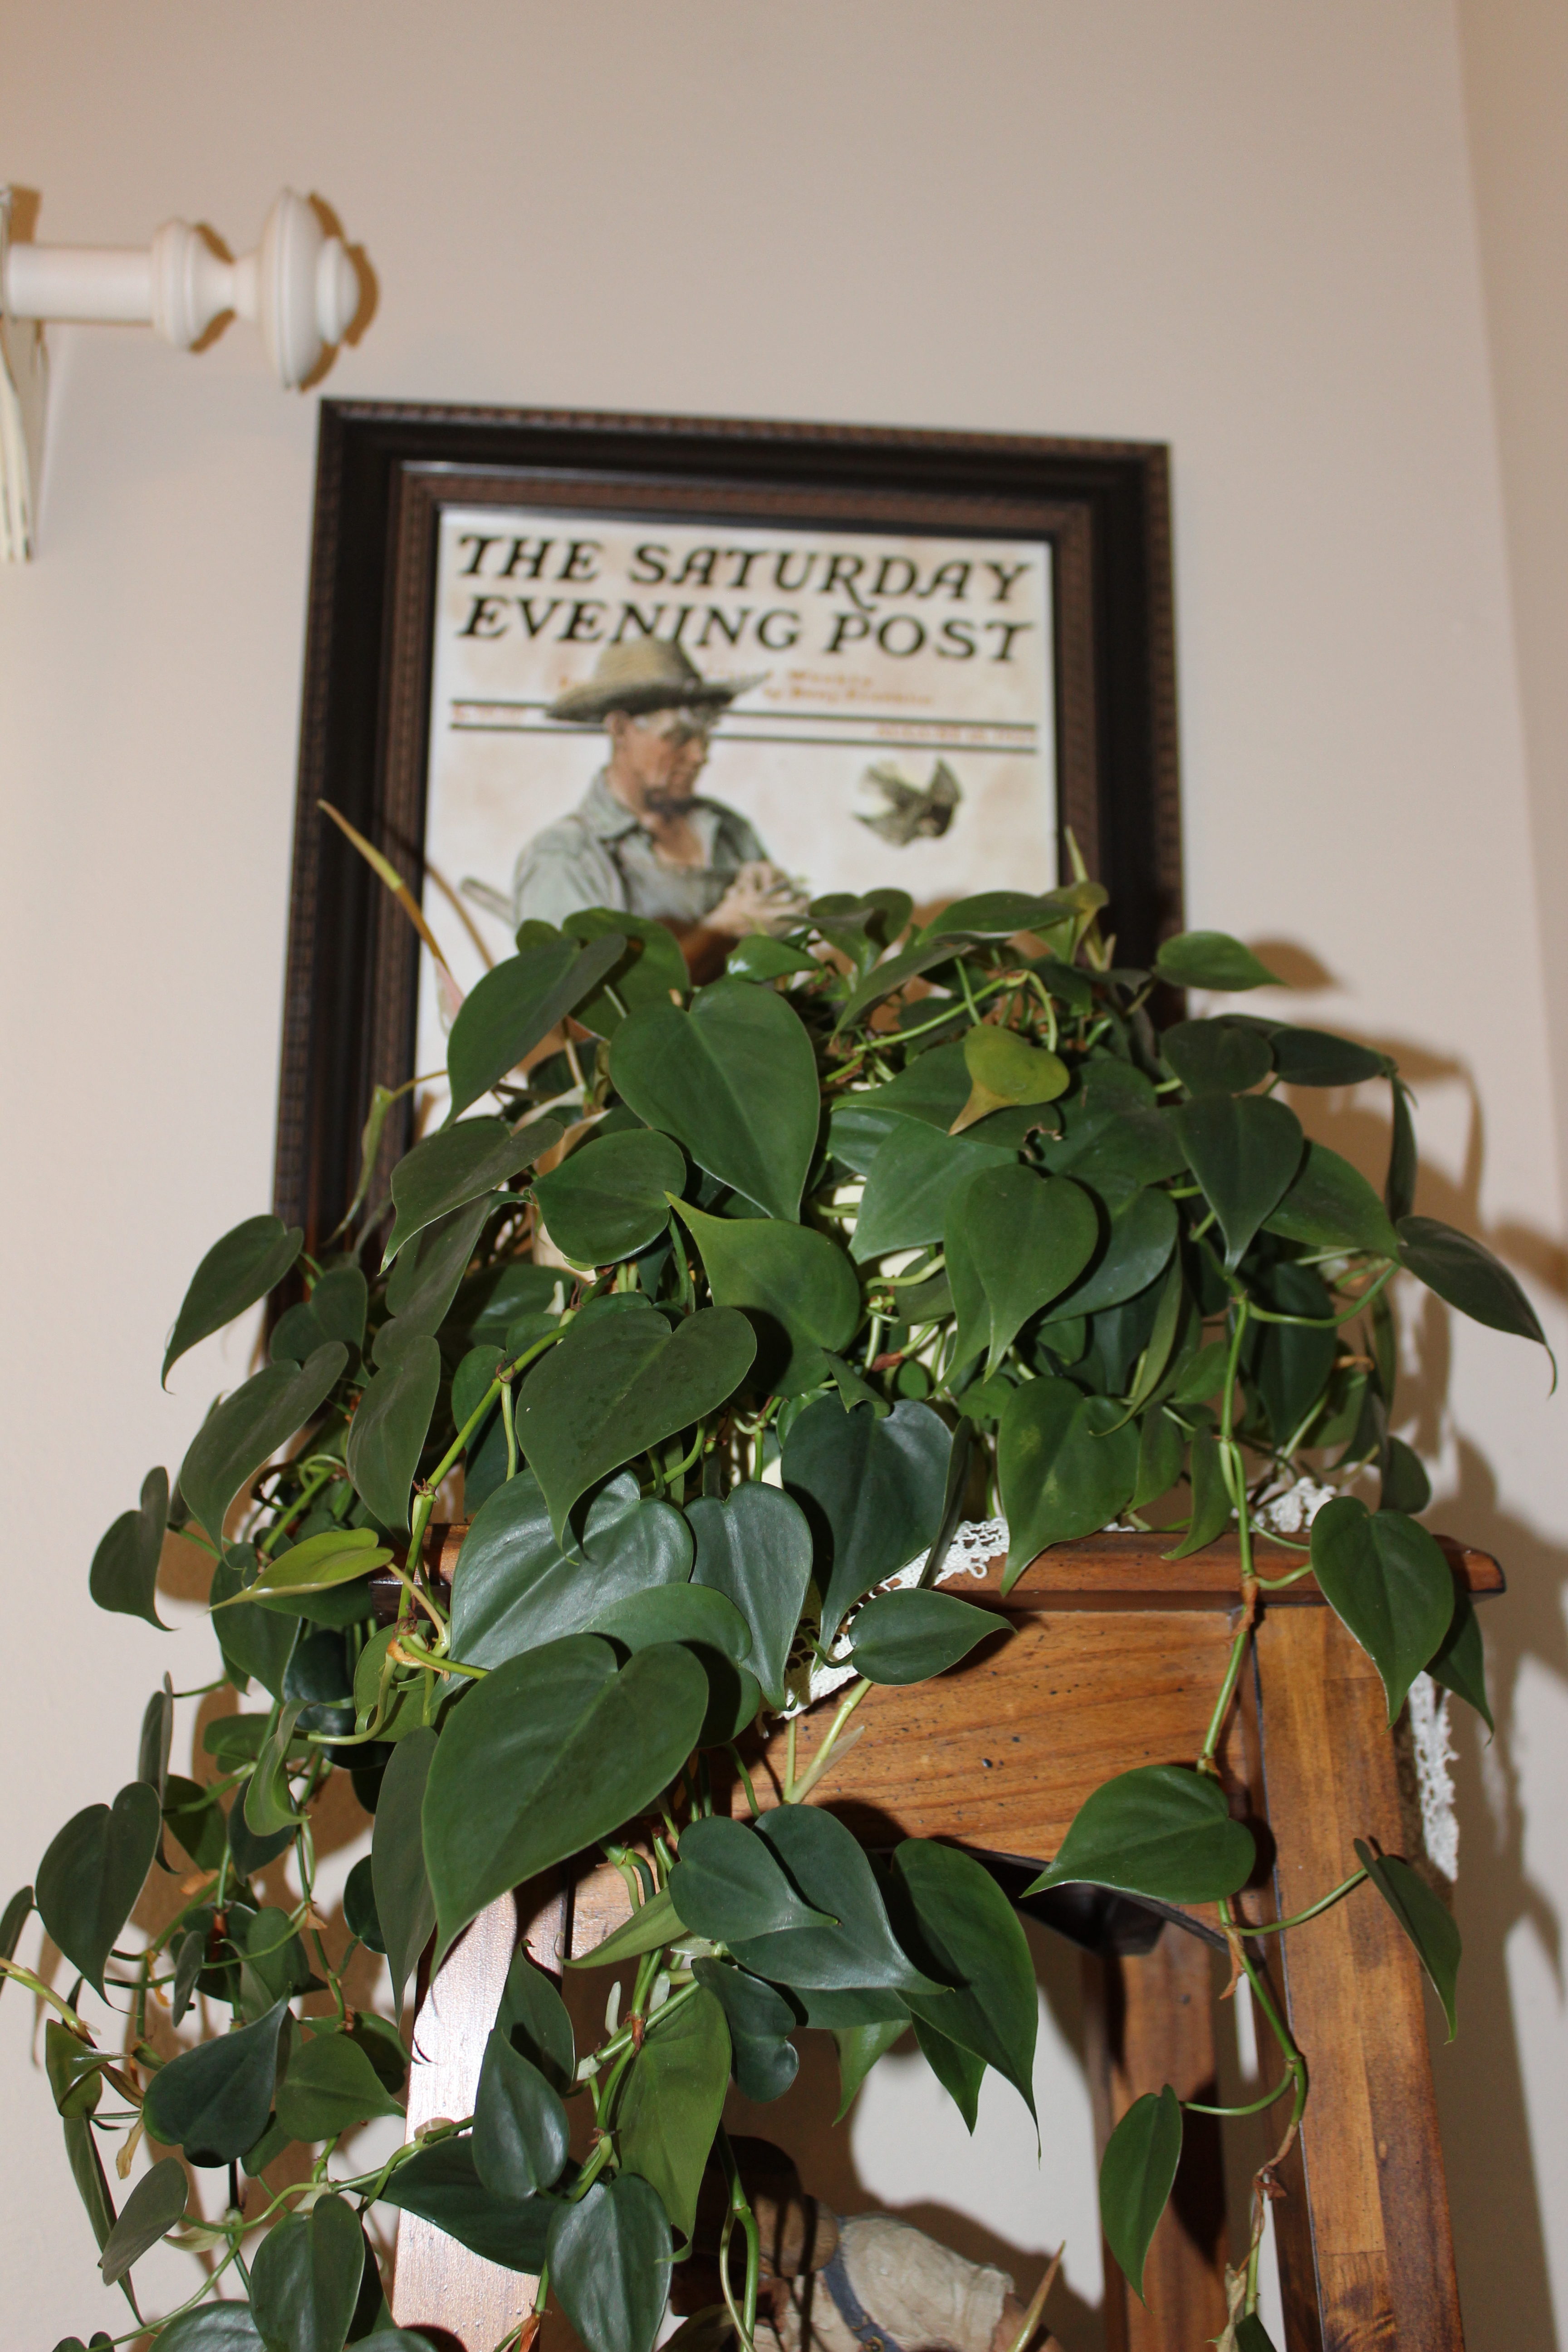
Some of the easiest plants to grow indoors are in the family Philodendron, with over 200 varieties, philodendrons are some of the most often used indoor plants. One of the easiest of these is the the Heart Leaf Philodendron. Originating in South America, and variously called philodendron cordatum sweetheart, scandens oxycardium or hederaceum var. oxycardium, this easy care plant is on NASA’s list for “clean air plants.” They can be purchased at every garden center, big box store and most grocery stores. The leaves emerge shiny and bronze but quickly turn dark green and heart shaped. They thrive in moist, but not wet, soil and bright indirect light, but tolerates lower light as well. Leaves will be pale if the plant is placed in an area with too much light. Not enough water produces yellow leaves, too much and the leaves will be brown. Too much fertilizer will cause brown leafs tips. In spite of this, sweetheart plant is very hard to kill. It has very few pests and the biggest concern is root rot from over watering. Caring for this plant couldn’t be easier, unless it’s a fake one, but why do fake when real is so easy??? Even the most brown thumbed of gardeners can grow it successfully.


Give it regular water, letting the soil dry out a bit between waterings. As always, test the soil by sticking your finger in the pot to about an inch, if the soil is damp, hold off, if dry, water. Fertilize with half strength (50/50 mix of fertilizer and water) monthly during the spring and summer, every other month during fall and winter. Wipe the surface of the leaves with a damp cloth or sponge to remove dust. Place it where it receives several hours of indirect light. That’s it. Couldn’t get any easier.

Heart leaf philodendron grows quickly and without trimming will grow as a vine like plant, with stems that can easily reach four feet. It can be trained to climb a small trellis but looks best with its stems drooping gracefully over the edges of pots, cascading down the edges of book cases or shelves. It makes an excellent hanging plant as well. Trim or pinch the stems regularly to keep the plant bushy or whenever the growth becomes spindly or stems get too long for the place you’ve chosen for it. Trim or pinch at a leaf node. (The place where the leave stem attaches to the plant.) Philodendron is easy to propagate, ensuring a continuing supply of new plants. Clip lengths at a leaf node, strip all but a few leaves on the stem and put in a glass or other container of water. Within two weeks you’ll see roots. You can leave the plant in your container and grow it that way for quite some time, I’ve left some in a container of water for months before potting because, as you know, I’m lazy and why should I take it out of a place it obviously loves and stick in a pot of dirt??? That seems cruel. But…if your object is to propagate a new plant for an actual pot then apologize to it and put it in a container filled with good soil. Water immediately after potting to thoroughly moisten the soil, but don’t soak it. Then water as needed. Re-pot your philodendron when it becomes root bound, making sure to gently separate roots before placing it in its new container.

NOTE of caution: The leaves of this plant contain calcium oxalates and are toxic to pets. If you have these plants in your home and notice your dog or cat pawing at its mouth, vomiting or drooling or foaming contact your veterinarian at once.
In the last few years new varieties have been developed with lighter green, almost chartreuse leaves and some with variegation. No matter which variety you choose, or what you call it, heart leaf philodendron IS a sweetheart and easily makes the list of almost goof proof plants, adding softness, color and life to almost any setting. It’s a perfect choice for farmhouse, cottage or country styled homes.


This post is all about Peace Lily, or as it’s known to the horticultural types, Spathiphyllum. (Fair warning, this is a lengthy post.) Peace Lily is a great plant for beginners and experts alike. It does require a bit more attention than either Ponytail Palm or ZZ plant, but not substantially more. In spite of its name, it isn’t a true Lily, it’s a member of the Araceae family and is native to the forests of South America. It’s on NASA’s list of the top 10 best house plants due to its ability to clean air. Peace Lily is great at breaking down and neutralizing Benzene, Carbon Monoxide and Formaldehyde, making it a great choice for bedrooms and offices. It generally stays within the two to three foot size indoors, but in ideal growing conditions and repotting when it needs it, can grow up to 6 feet, making a striking focal point in a room.
Peace Lily’s needs are relatively simple. It needs indirect light and moist soil. Too much light will result in yellow leaves, some will show brown spots and streaks. Too little light and the plant will lose vigor and eventually die. It can survive quite well in an office under florescent lights, and in dim rooms for awhile. If you want to keep one in a room without much light, move it temporarily where it can receive several hours of light a couple of days a week. If this seems like too much work remember that it can live for years with proper care, and with it’s beauty and air cleaning abilities, moving it to get light now and then is worth the effort. The blooms aren’t especially showy but when the plant is in full bloom it’s quite beautiful. White bracts arise on slim stalks above the leaves. The name, Peace Lily, was given because some people believed the bracts resembled white flags of truce. Normal bloom times are spring and fall, but it can bloom anytime during the year with the right lighting. When the flowers are spent, trim the stem at the leaf joint. Remove dead leaves as they occur to keep it looking well groomed.

One of the great things about Peace Lily apart from its appearance, is it will actually let you know when it needs water. When the leaves begin drooping it’s time to give it a drink. If you come home from a busy weekend or trip and find your Peace Lily’s leaves completely wilted and hanging over the edge of the pot, don’t throw it out. Water well and mist its leaves, it should recover. Too many of these rescues, however, will cause the plant to lose vigor and eventually it will no longer thrive. Make sure to check your plant’s soil weekly, using the “old finger test” to see if the soil is moist. If you want to know what the old finger test is, refer to Parts 1 and 2 of the Goof Proof Plant series. (See how clever I am, getting you to read those other posts??) Peace Lily is sensitive to chlorine and will develop brown leaf tips in its presence. Before watering let the water stand overnight to let the chlorine neutralize. Or use filtered spring water. Or live with brown tips like I do.
Fertilizing isn’t a must for this plant. Some growers never fertilize it, but most plant people agree that fertilizing once a year (in spring) will help your plant live a long and healthy life. Commercial liquid fertilizers may have too much salt, again causing leaf tip browning, so use a very weak fertilizer solution (mix with water), or a slow release type. I add composted cow manure to the top of my pots once a year instead of fertilizer. You can find bagged compost at any garden center or big box store. (Don’t worry, your home will not smell like a cow barn, compost doesn’t stink, feel free to add it to your plants.)

Rot is the biggest enemy of Peace Lily. Most people kill their plants with kindness by over watering. Use a pot with a built in saucer to allow the excess water to drain away. I use plastic pots inside my decorative containers so that I don’t ruin my containers, I get the look I want and don’t have to look at cheesy plastic pots. Plastic pots should be banned from view, don’t you think? Where was I? Oh yes, watering. Water when needed, on the plant’s schedule. Test the soil. Periodically check your plants for signs of rot. Leaves will appear limp, and light green. Do the smell test. Rotting plants will smell…bad. The soil will smell bad. You won’t like it. Neither will your plant. Take the plant out of its pot, if you see or smell signs of rot, remove the plant and knock the wet soil off the rootball. Trim the rotted roots off, clean and sterilize your pot with a weak solution of bleach and water, rinse well and dry. Add new soil, plant and then water. Check every few days to see if it needs more water, if so, water thoroughly and then let it dry a bit until the leaves start drooping, then water. Don’t fertilize until your plant has fully recovered.
Dust leaves on a regular basis. Dust build up blocks the plant’s ability to use light. Commercial shine products aren’t recommended because they clog the pores of the leaves, a paper towel or sponge dampened with plain water is all that’s needed. Peace Lily is mostly pest free, but it does occasionally become a victim of Peace Lily Aphids, tiny green sucking insects that leave behind a sticky slime. Treat with insecticidal soap. (Be sure to read package directions.) Mealy bugs are infrequently a problem, they are small pinkish or yellowish bugs and can be treated by wiping with cotton balls dampened with alcohol, use an alcohol soaked Q tip to get into the joints of stems and leaves.
If your plant seems to need water every few days and you can see roots at the top of the pot, it’s time to move it to a bigger pot or divide it and end up with another…free plant. (yay! I love free!) Dividing is a simple process. Remove the plant from its container and gently pull the roots apart with your hands. You’ll be able to see “clumps” of the plant. If you want to divide it, just gently pull one of the clumps, holding it by the base of the leaves, until the clump separates from the mother plant. Repot the mother plant in its old container, adding new soil. Water. Plant your new division in a pot that is suitable for its size, 2-3 inches larger in diameter than the plant is wide. Use a good quality potting mix. Tamp the soil down in the pots to get rid of air pockets and don’t let the soil pile up around the base of the leaves. Water and move to its new location. If you are going to repot your original plant to a bigger pot, use a size larger than than the current one. (example; from a 1 gallon to a 2 gallon, or a 3 gallon if no 2 gallons are available, from a 3 gallon to a 5, etc.)
Peace Lily’s leaves are toxic to dogs and cats but not generally fatal. Cats are a bit more sensitive. One bite and most pets will spit out the leaf. There may be some pawing at the mouth and/or salivating because the oxylate in the leaves burns the sensitive tissues in the mouth, if swallowed, count on cleaning up vomit. So…. If you have small children and pets, take care not to let them eat the leaves. If in doubt, always call your Doctor or Veterinarian immediately. All things considered, Peace Lily is a beautiful addition to any style home and worth the bit of extra effort. Give one a try. I’m betting you’ll love this beautiful plant as much as I do.
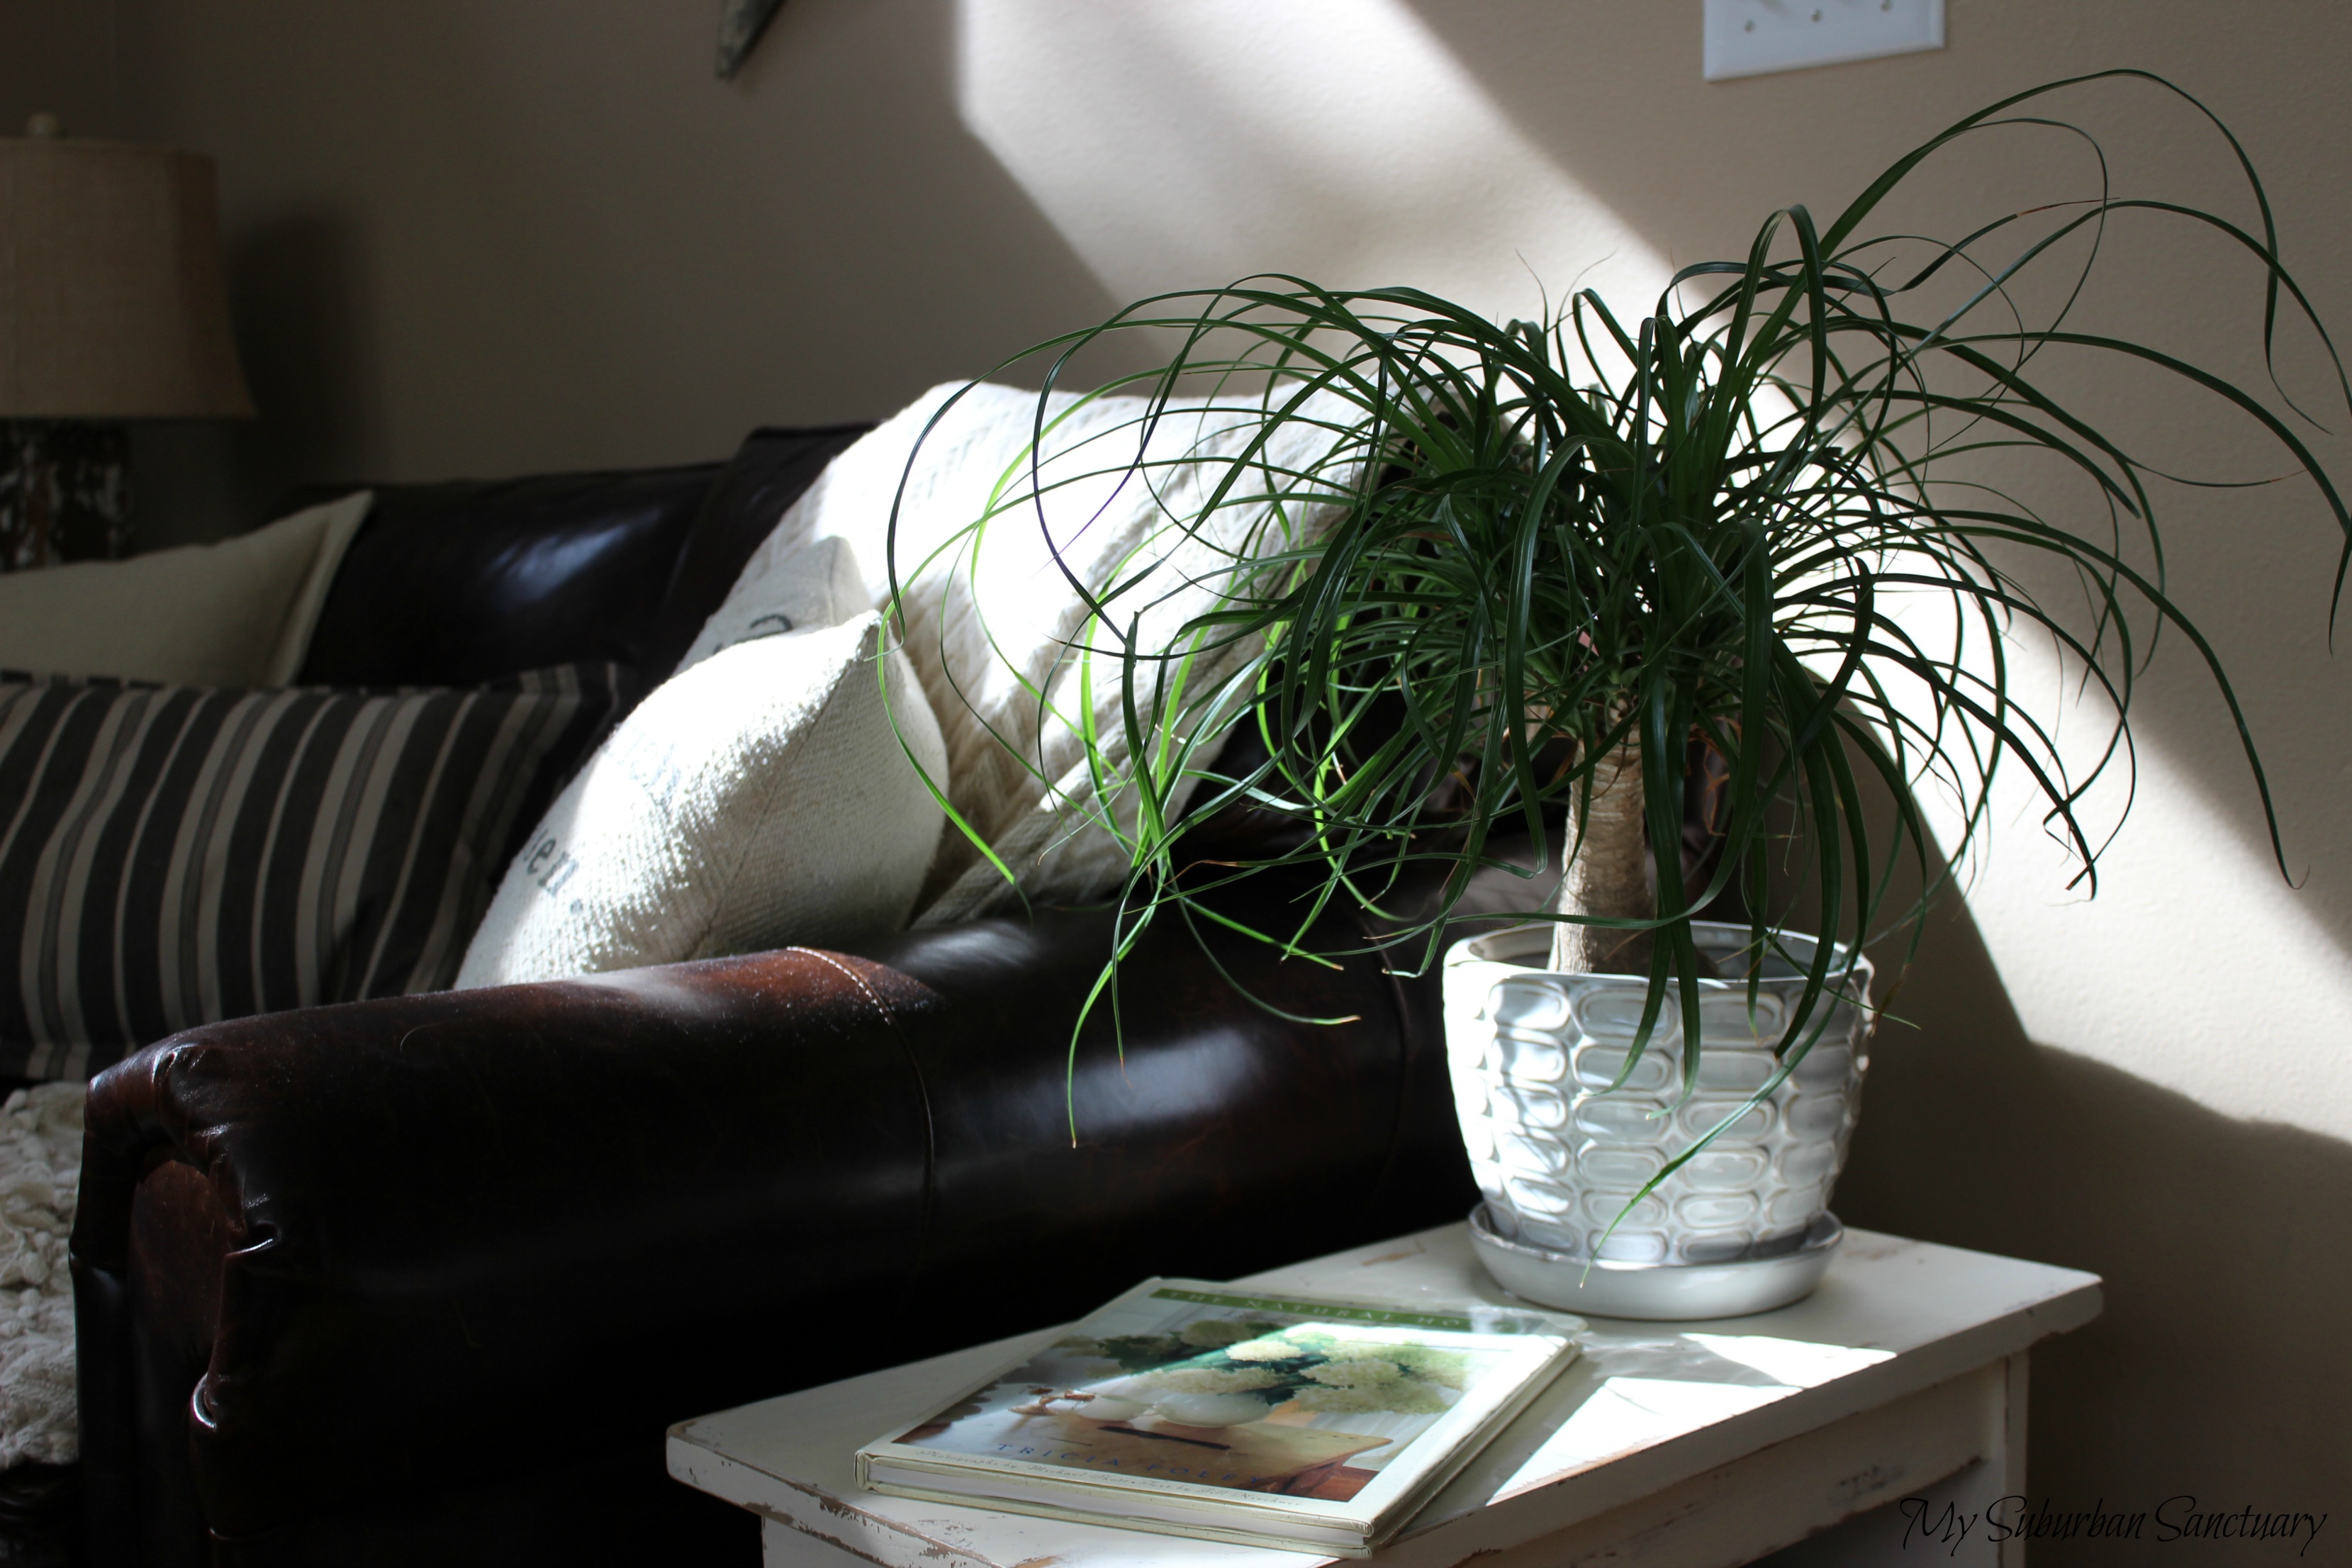
Part 2 of the (almost) goof proof plant series introduces the Ponytail Palm, “Beaucarnea Recurvata”. Not really a palm at all, Ponytails are members of the Lilacea (Lily) family and are also known as “Elephant Foot Palm” or sometimes “Bottle Palm”. True to its common name, the leaves of the ponytail sprout from the top of the plant and it looks much like the ponytail I sport on the top of my head while doing chores…. only prettier. The elephant foot reference is because its trunk ends in a textured, almost wrinkled looking bulb, similar to an elephant’s foot, where water is stored. It thrives in warm, dry soil locations and likes bright light. In its native Mexico it can grow to almost 20 feet outdoors but is easily kept to a mature size of about three feet indoors. Although it likes warmth, it can take lower temperatures in winter. (50 degrees is about the limit to keep it thriving.)
Ponytail Palm is one of my favorites for a few reasons; 1) It’s beautiful. The weeping growth that occurs as the plant gets older is lovely 2) it’s slow growing which means I don’t have to replace it frequently with a smaller plant as I do some that have fast growth rate. 3) It can be pruned to keep it small. And 4) It’s low maintenance and forgiving of benign neglect. Yay. I don’t have to nurture, baby or otherwise worry about it, I’m into benign neglect. I don’t like fussy and needy plants.

As usual, there are some growing tips:
Ponytails like being somewhat root bound. No need to re-pot unless the roots have broken through your plastic pot. Which happens, so use a clay or glazed pot. (I keep mine in the plastic nursery pot it came in for ease of watering, but I hide it with a pretty glazed pot.) If you decide to re-pot, use a pot that’s only an inch or so bigger around as well as deeper. Use a fast draining soil, cactus soil mixes are ideal.
Water only when the soil is dry and water deeply, then leave it alone for at least a week, sometimes longer. I water mine about once a month. I submerge the whole plant, plastic pot and all, in a bucket of water for less than a minute, a few seconds really. Then I let it drain and pop the whole thing back in its pretty glazed pot. This technique means I don’t have to guess or worry about over watering in the glazed pot. I can see the water draining out of the plastic nursery pot it came in and once drained it goes back in its glazed container, plastic pot as well. Always check the soil of any plant before watering! If you read Part 1 of the plant series on the blog, you’ll already know the technical term and tool to use to check the soil to see if it needs watered. Your finger. In the pot. As in, stick your finger in the soil to about an inch. If it’s dry, water, if it’s moist don’t. Truly I am a master of of all things technical. Mist your plant once a week or so to increase humidity if your house, like mine, is dry from air conditioning in the summer or heat during winter.
Bright light is a must. So put it somewhere where it will get several hours of sunlight everyday. Fertilize only twice a year during the growing season (in summer for most of us) with a 50/50 mix of liquid fertilizer and water.
TROUBLE SHOOTING:
PESTS. Although it’s usually pest free, the Ponytail does sometimes become a victim of either scale or spider mites. Scale look like waxy bumps on the leaves of the plant. Spider mites are tiny little red insects that will leave small telltale webs on the leaves. A light spray of insecticidal soap or application of neem oil will control both. Dead scale are easily removed by scraping them off the leaves with your fingernail. Use a damp cotton swab to remove the webs of spider mites.
YELLOW LEAVES. Too much water will result in yellow leaves and a soft trunk bulb and shaft. Check to see if your plant’s roots are rotting or if the soil smells bad. If so, remove it from the pot, let the plant completely dry out, clean your pot and sterilize with a weak solution of bleach and water, rinse it well, dry it, and use new soil. Replant and water once. Then begin again, monitoring your water use.
SHRIVELED BROWN LEAVES, or a desiccated (dried and shriveled) trunk means you aren’t watering enough. Soak the plant for a few minutes in room temperature water and let drain. Water more often, but check the soil to make sure you don’t over water.
BROWN LEAF TIPS. Severe browning of leaf tips or entire leaves is generally due to not enough water or lack of humidity or 2) Too much fertilizer, too often, or 3) water that is chlorinated or has excess minerals. If you have treated (city or county) water and brown leaf tips, switch to spring water and mist your leaves to increase humidity. 4) Brown tips can also occur as a matter of age. Trim the brown tips off, once brown they will never be green again. Use a dedicated pair of shearing/pruning shears. Clean your shears with alcohol after using. You can see that there are a few brown tips on the leaves in my pictures, and if you look closely you’ll see one or two small dead, brown leaves. This is normal. I haven’t trimmed the tips of my plants since last spring. Because I’m lazy. I might trim them in time for our annual Super Bowl party. So that everyone can admire how pretty it is and marvel at my plant parenting skills. Probably not, I’ll be tired from cleaning my baseboards so that everyone can marvel at my housekeeping skills instead. I mean, I have my priorities.

Give the Ponytail Palm a try, it’s a beautiful, graceful plant that you can enjoy for years. It adds life to any space and really isn’t fussy. It’s almost goof proof.
I love adding plants as decor in my home. House plants add life, along with texture and color. An otherwise flat, dull room gains energy and comes to life with that addition of a bit of green. Today I’m going to write about one of my favorite forgiving house plants. One that almost anyone can grow, even you brown thumbers. You know who you are, so pay careful attention.
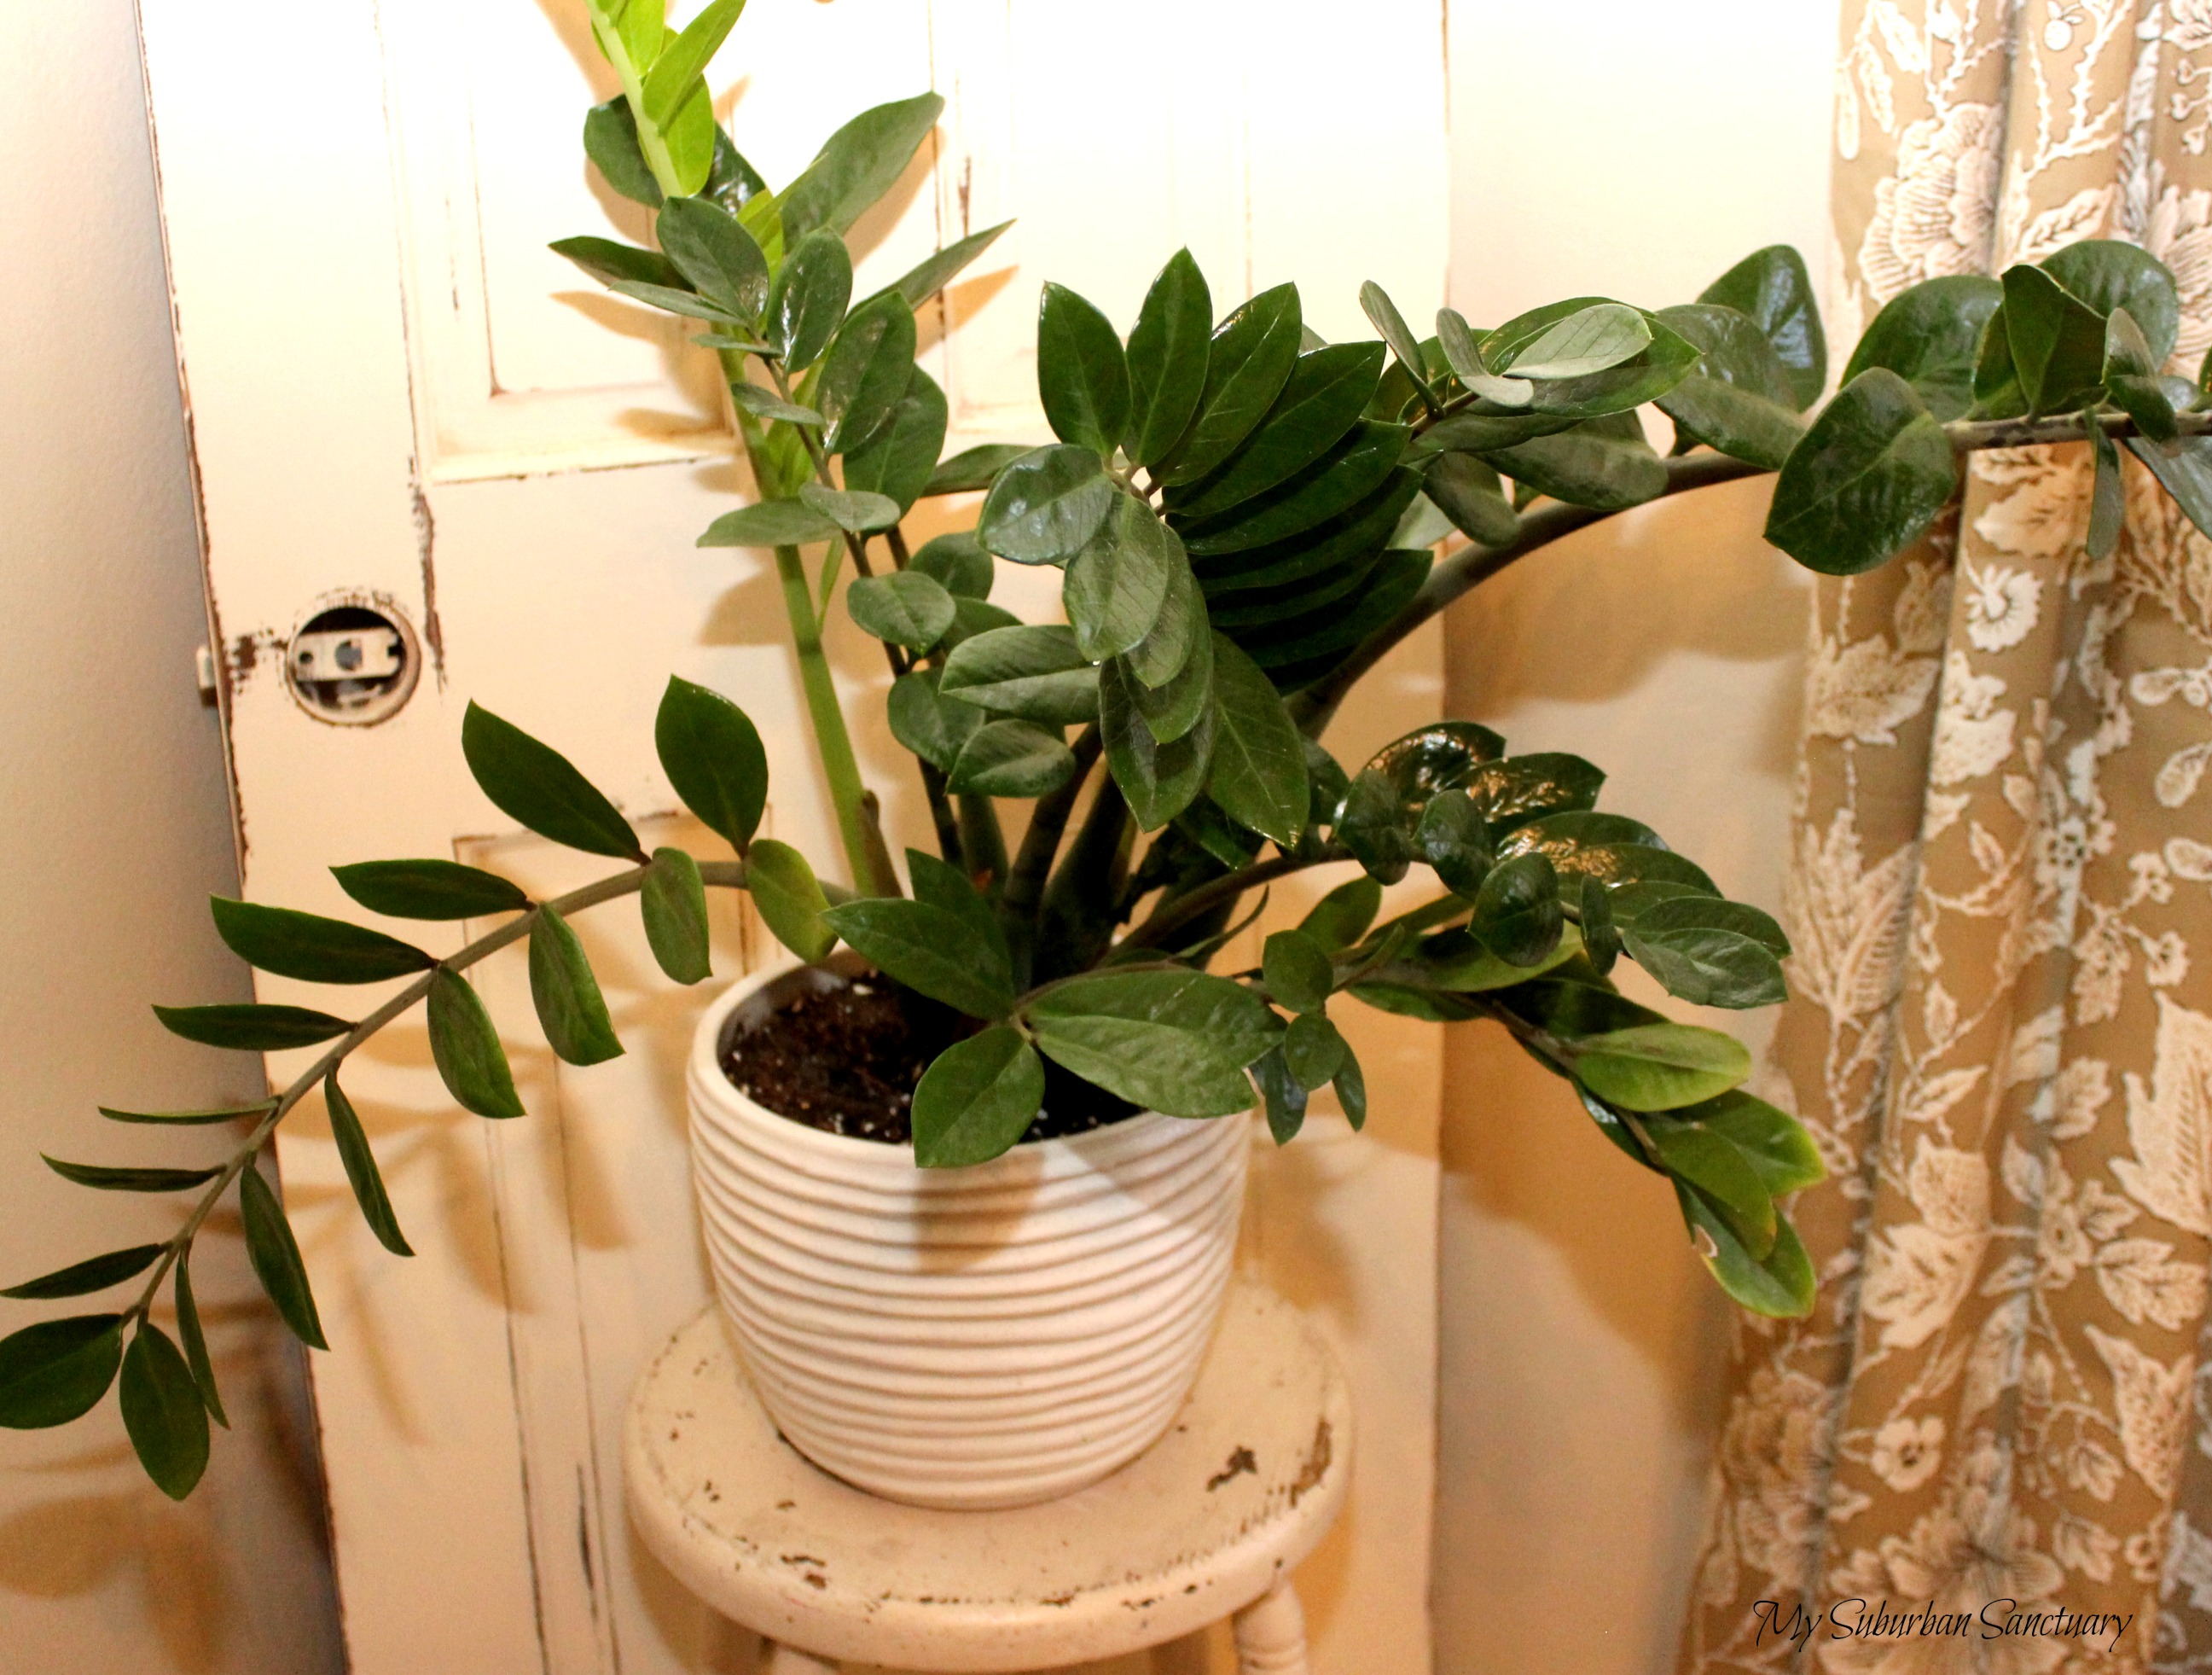
NUMBER ONE on my easy to grow plant list is the ZZ plant, Zamioculos Zamiifolia, a mouthful if there ever was one, hence ZZ. A native of the Southeast coast of Africa, in the Tanzania and Zanzibar areas, ZZ is one of those plants that looks good in any setting from contemporary to farmhouse. Plant it a silver cylinder pot and it becomes a modern art piece all its own, but pop one in a galvanized bucket and the look is dramatically changed to one that’s informal. Stems can grow up to about three feet and begin to arch as they grow making the plant look even bigger. ZZ likes bright indirect light (not directly in front of a window), but also does very well in dim light. Plant your ZZ in a pot that has built-in drainage, or one that has a saucer so that excess water drains away. Forget the adding gravel to the bottom concept. The pot will still hold water and the plant’s roots will still sit in it, just not in the soil. So use a light soil mix and a pot that drains. ZZ likes to be slightly root bound and will grow happily in the same pot for a couple of years. If you re-pot, use a pot that is only an inch or two larger. ZZ plant is poisonous if ingested, so be careful using this plant around pets that like to nibble or chew. Pay close attention to toddlers who might be attracted to its thick leaves.

Regular watering isn’t required, in fact ZZ is one of those plants that thrive on benign neglect. Water is stored in its leaves, which are thick, bright green and waxy, and in the thick stems. Water only about once a month. I check my plants weekly, watering needs can change during either the growing or dormant seasons for different plants. Checking means you will water when your plant needs it and not when you think it does. Water the ZZ again when you notice the soil is dry to below one inch. Use the technical, scientific method of determining soil moisture by sticking your finger in the soil, if it’s dry below an inch or so, water, if still damp, don’t water. (That’s as scientific as I get.)
Dust its leaves periodically with a soft, plain water dampened cloth (do this for all your plants) and check for pests. ZZ plants are hardy but occasionally get spider mites or scale. If you see tiny reddish bugs or a small web in between leaves, use a mild insecticidal soap (readily available at big box stores). Scale looks like waxy bumps usually on the underside of the leaves. You can also use the insecticidal soap mixture, but stubborn scale infestations may require applications of Neem Oil. Follow the package directions for both treatments. Scrape off dead scale with a finger nail, gently so that you don’t scar the leaves.

Curling leaves, yellow or leaning stems means the light is too bright and your ZZ is trying to move away from it. Change it’s location to one that’s a bit farther away from the light source or move it to a different location with dimmer light. If there are yellow or brown spots on the leaves it’s getting sunburned and needs to be moved immediately. ZZ will die, one stem at a time, from over watering, if you notice a withering stem, or one with limp leaves, take the whole plant out of the pot and check to make sure the roots aren’t wet and rotting. Remove the rotten stem root and all , clean the pot and replace the soil. Re-pot and water once. Let the plant soil dry as recommended before watering again.
Try a Zamioculos Zamiifolia even if you’ve murdered every other plant you’ve ever brought home. This one will surprise you. (I’m optimistic.) If you kill it, there is no hope for you so just get your plants from Ikea, you can’t kill the never-alive-to-begin-with.

+PLANTS+Part+4&media=https://www.mysuburbansanctuary.com/wp-content/uploads/2017/02/IMG_7364-e1486590772985.jpg)
+PLANTS+PART+3&media=https://www.mysuburbansanctuary.com/wp-content/uploads/2017/01/IMG_7448.jpg)
+PLANTS+PART+2&media=https://www.mysuburbansanctuary.com/wp-content/uploads/2017/01/IMG_7416.jpg)
+HOUSE+PLANTS,+Part+1&media=https://www.mysuburbansanctuary.com/wp-content/uploads/2017/01/IMG_7386.jpg)
Recent Comments